How I’ve been using React Native


And some practices that I’ve found useful…
React Native is pretty damn awesome. I have been working on a few React projects for a while, and being able to do the same kind of thing for mobile is amazing.
Also, being able to create a mobile application for iOS and Android using the same technology is great!
Starting a React Native project
Getting started with a React Native project is rather simple. However, you might find different ways to bootstrap your project depending on where you get your information. This is because you could create your project using the create-react-native-app npm package. This makes sense if you’ve worked on a React project that you’ve bootstrapped using create-react-app.
Introducing Expo
The new way of creating your React Native project is to use Expo.
Expo is a free and open source toolchain built around React Native to help you build native iOS and Android projects using JavaScript and React.
The advantage of using Expo is that you don’t have to deal with configuring XCode project files or Android manifests. It is all done for you. If you do need the extra control then you can easily eject Expo. However, I would advise trying to get things done without having to eject. Once you eject you may find that it makes your life more difficult.
It is also really easy to test on your device using Expo. When you run yarn start you are given a QR code that you can scan with your mobile devices camera. This then gives you the ability to test out your application on your device, which is a lot more valuable than testing on a simulator.
How to structure your project
I remember scouting the internet trying to figure out the best way to structure my projects. And there are a lot of different opinions out there. I have found that you can structure you project depending on a few factors:
- The size of the project
- The lifetime of the project
- The teams that will be working on it
If you are working on a relatively small project then you don’t have to worry much about splitting up your code into modules. It is great if you can, but it is not a big issue.
If you have a long running project that may start growing in size then you will benefit from splitting the features of your app into modules. This will also help when you start adding developers to the team. It means they can start working on specific features without stepping on each others toes!
We all know how much fun it can be when you have to deal with merge conflicts 😅
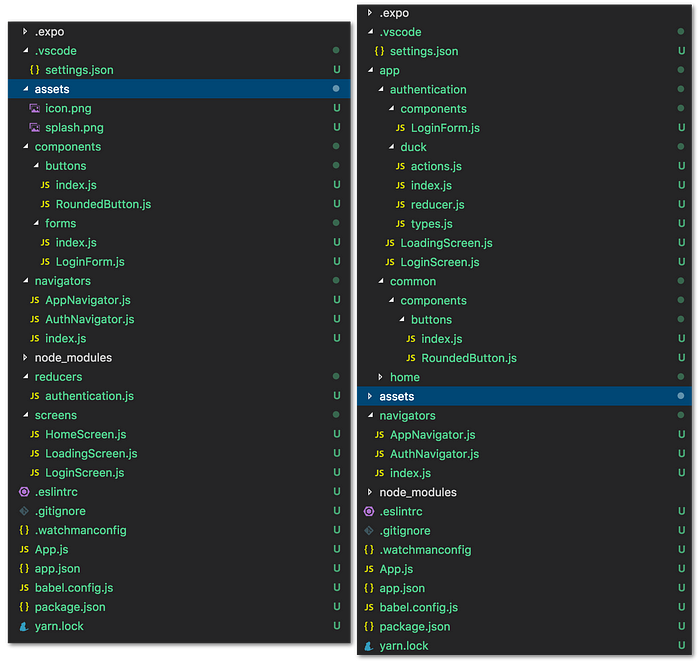
With a large project you could also add a navigator for that feature if you want to include a way to navigate around using tabs. You can also pull out actions from a features duck if you need to 😄
How to implement navigation

I’ve enjoyed using React Navigation. It provides an easy way to implement routing in a React Native application. You can set up multiple navigators based on how you want to be able to navigate through different screens. You can create a navigator for navigating using tabs, or that allow you to navigate back to the previous screen.
createStackNavigator— As the name suggests, it is analogous to creating a stack of screens. You can also go back by callingthis.props.navigation.goBack()createBottomTabNavigator— This allows you to create a set of tabs at the bottom of the screen to get you to your different screens.
Useful info from the React Navigation website
this.props.navigation.navigate('RouteName')pushes a new route to the stack navigator if it's not already in the stack, otherwise it jumps to that screen.- We can call
this.props.navigation.push('RouteName')as many times as we like and it will continue pushing routes. - The header bar will automatically show a back button, but you can programmatically go back by calling
this.props.navigation.goBack(). On Android, the hardware back button just works as expected. - You can go back to an existing screen in the stack with
this.props.navigation.navigate('RouteName'), and you can go back to the first screen in the stack withthis.props.navigation.popToTop(). - The
navigationprop is available to all screen components (components defined as screens in route configuration and rendered by React Navigation as a route).
Styling components in React Native

Styling components is rather simple. It is just like styling your website using CSS (mostly).
The idea is that you scope your styles to your components. So in your component (or screen) file, you can create a stylesheet using const styles = StyleSheet.create({});. This is an object you can use to attach to each of the elements in your rendered component.
import React from "react";
import { StyleSheet, Text, View } from "react-native";const MyComponent = (
<View style={styles.container}>
<Text style={styles.header}>This is a header</Text>
<Text style={styles.text}>This is some text</Text>
</View>
);export default MyComponent;const styles = StyleSheet.create({
container: {
flex: 1,
justifyContent: "center",
alignItems: "center",
},
header: {
fontSize: 24,
fontWeight: "bold",
textAlign: "center",
color: "red",
},
text: {
fontSize: 18,
textAlign: "left",
color: "blue",
}
});
As you can see, this is a simple and powerful way to make components look the way you want them to 😎
Adding styles to the bottom of the file is beneficial, because most of the time you aren’t concerned with the way a component looks, but rather by what it does.
Summary
Expo is an extremely powerful toolchain. It has made building React Native apps painless, and I don’t think I’d have the same level of productivity if I had to create mobile apps using their native languages, e.g Swift, Java, Kotlin. And being able to scan a QR code to get the code running on your own device is incredibly useful.
Hopefully what I have covered helps with anyone starting to delve into the world of React Native.