Lock-step Refactoring in Node.js (Part 1)


I am the maintainer of an open source project called fakergem. It is basically a port of one of my favourite Ruby gems, faker. I enjoyed using faker so much that I wanted to have a similar experience when working with fake data in Node.
The initial releases
The start of the project was easy. I just followed these simple steps:
- Create a project board on Github with the list of faker modules that I want to implement.
- Each faker module had documentation, so I’d convert it from Ruby-syntax to Node-syntax.
- I’d write a few tests to make sure that the faker module returns expected results (following TDD approach 😎).
- I’d implement the faker module.
This seemed like a nice approach, and I managed to get a lot of the faker modules completed. I used Gulp tasks for my build pipeline, which included linting and code coverage. I also had a watch task that would check for any source code changes and run the tests automatically. This really sped up the development process.
Something was bugging me 🙈
The library was working well, but occasionally tests would fail. I felt that it was because I wasn’t in control of what values I got back when running my assertions. I created an issue and left it there to mature for a while. I felt that someone may pick it up, but that didn’t happen.
I had previously used faker.js to add fake data to my node projects, and remember looking at the source code and finding something that intrigued me. The way it works is by adding each module to a main object, and then that object can the use other faker modules that are attached to it.
self.name = bindAll(new Name(self));
I felt that I could probably add something like this in my project!
How does lockstep refactoring help? 🤔
Lock-step refactoring is something that I took from the concept of lock-step deployments.
An example of a lock-step deployment is where you have a service pointing at version 1 of your API.
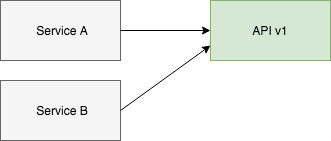
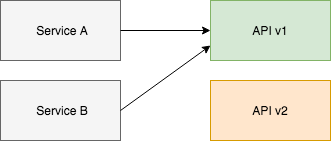
Then if you want to add a breaking change you can build version 2 of the API alongside version 1.
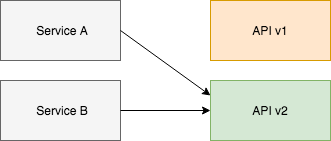
Then when it is completed you can swap them over.
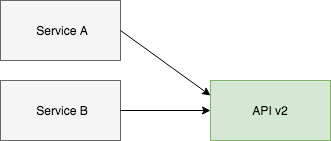
Then you can eventually delete version 1.
I could use this same workflow for refactoring my faker modules 🤓
Let’s start with a simple module first
The Ancient faker module seems simple enough…
Here we have a few methods that just return an item pulled out of an array. Now how can we get this to still work while at the same time adding our new and improved code?
Here we have created a default export which is the new class that we want to create. If we run the tests you will see that they still pass! ✅
We aren’t doing anything fancy yet. This step was basically just a copy+paste job! Now we just need to add this new class to the main Faker object.
When we replace the import * as Ancient with import Ancient we start using the default export. Now the exported functions in ancient.js should be ignored (except for in the tests, which we will sort out next).
Now we need to modify the test file so we use the main Faker object, instead of the module on its own. This will then become the standard way of writing tests for faker modules.
So the test will go from looking like this:
to this:
And if we run the tests we can see everything is still working as expected ✅
Now we can delete the redundant code in the faker module 🔥 😈 🔥
Right, what next?
I am aware this is becoming quite a sizeable article…so I shall delegate the next step to part two. The next part will involve creating a new faker module that we can use to enable predictable randomness for our tests 👍