Make It Dark - Hooking up the Engine to the UI


After meticulously crafting the foundational classes like GridManager, LightToggleStrategy, WinConditionChecker, and assembling them into our "finely tuned engine," the GameEngine, the stage is set for the final act: bringing Make It Dark to life with a user interface. The groundwork in previous posts ensures the game's logic is robust and ready to be interfaced with Svelte, a modern framework designed for building reactive and efficient components.
Building a Landing Page

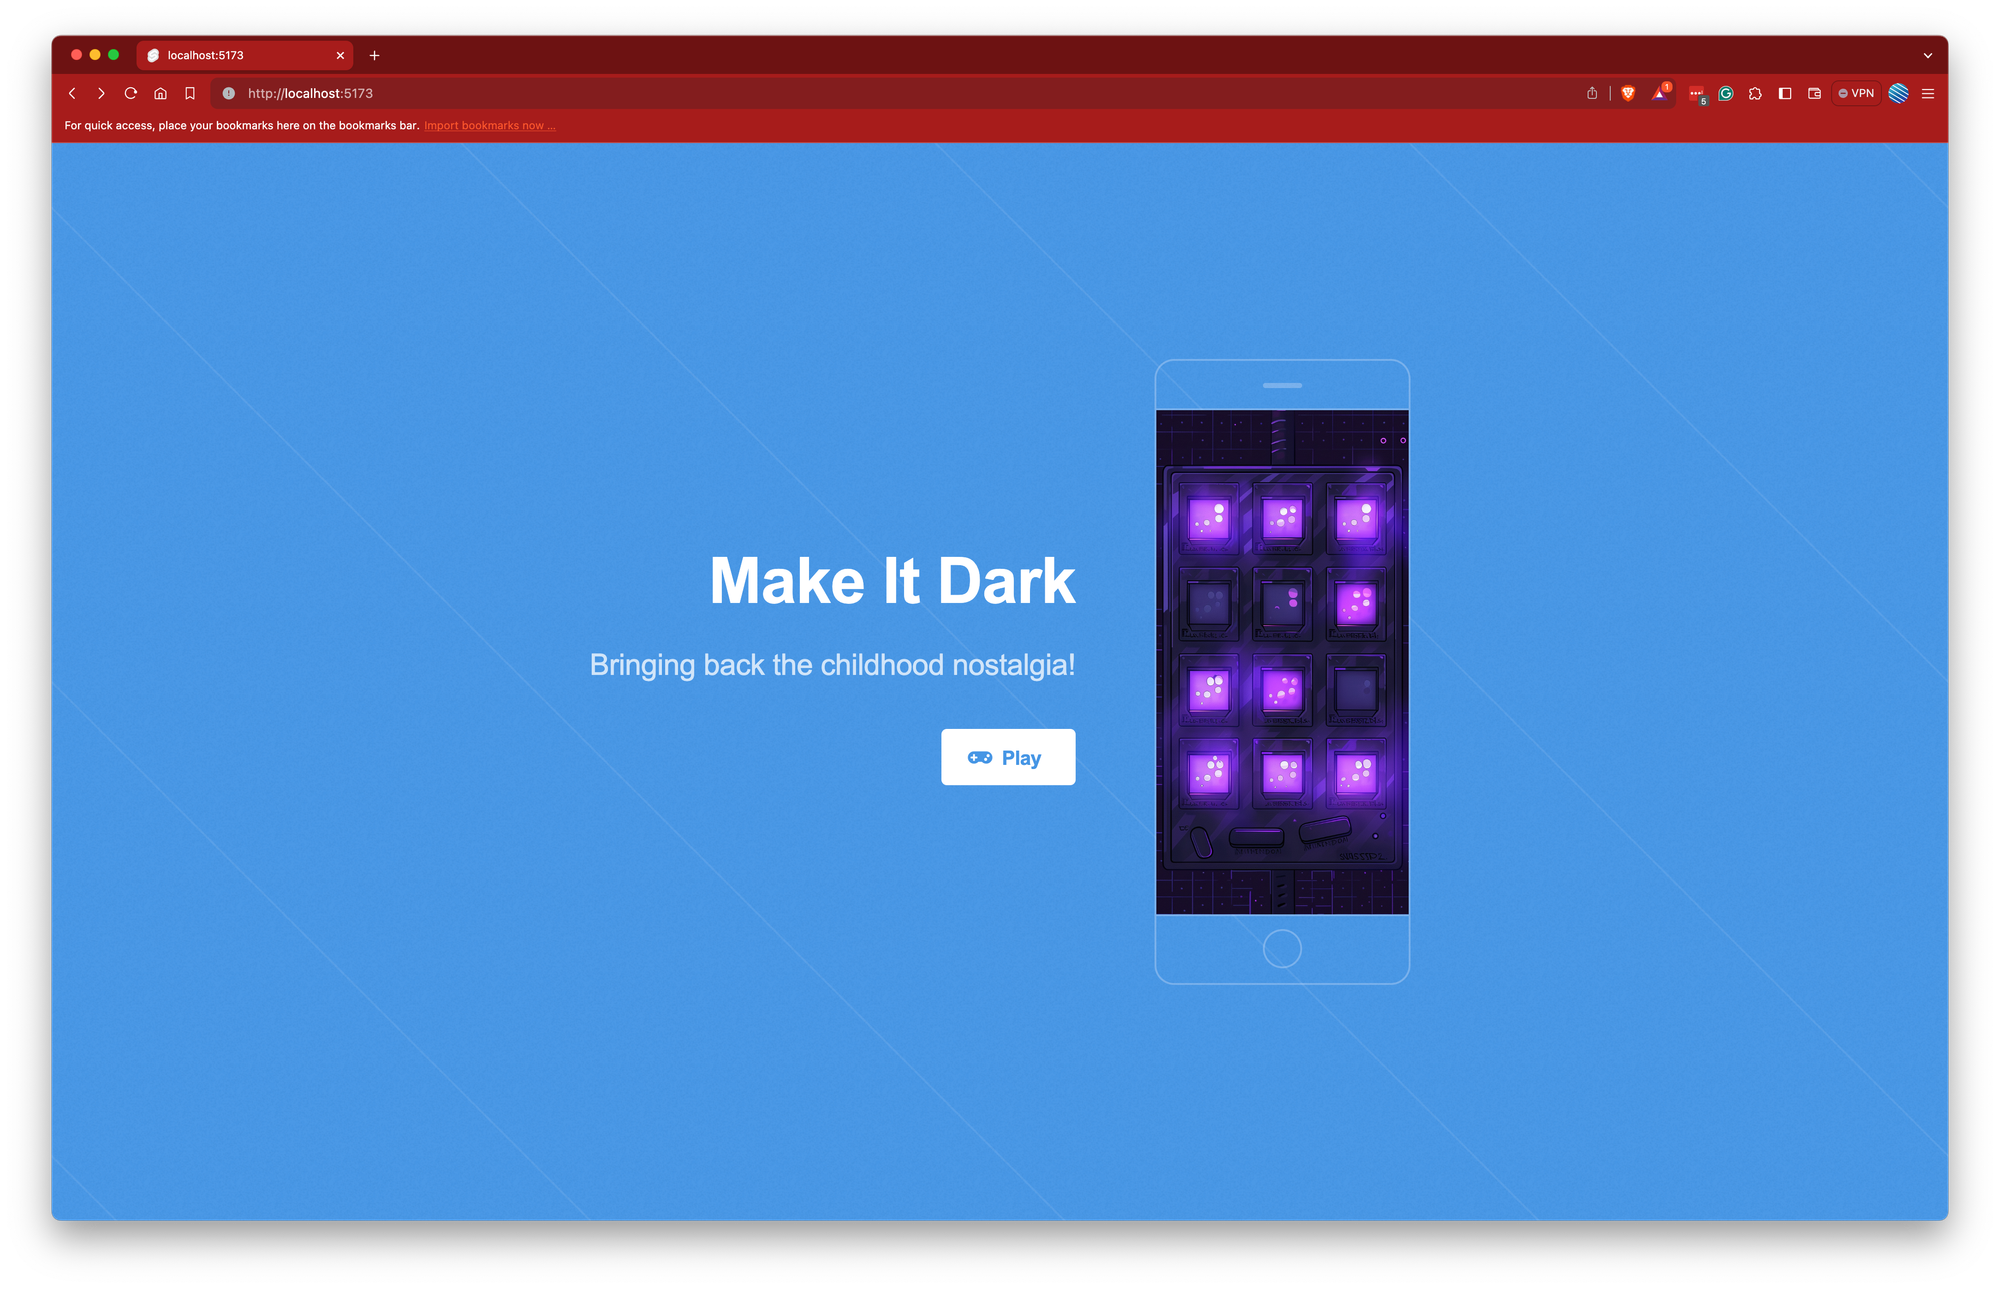
For the landing page, I wanted something straightforward yet captivating, a portal that immediately draws players into the game's essence. The HTML5 UP's Fractal template was perfect for this purpose, offering a sleek design that could be easily adapted to fit the game's theme. The process involved taking the HTML structure provided by Fractal and integrating it into a Svelte page, ensuring a seamless blend of template aesthetics with Svelte's reactive capabilities.
Fractal comes packed with various elements designed to cater to a wide range of websites, but for Make It Dark, I required a significant simplification. The goal was to keep the focus on the game, eliminating any superfluous content that didn't serve this primary purpose. Here's the streamlined version of the Fractal template I ended up using, specifically tailored for the game's landing page:
<!-- Header -->
<header id="header">
    <div class="content">
        <h1><a href="/">Make It Dark</a></h1>
        <p>Bringing back the childhood nostalgia!</p>
        <ul class="actions">
            <li><a href="/game" class="button primary icon solid fa-gamepad">Play</a></li>
        </ul>
    </div>
    <div class="image phone"><div class="inner"><img src="/images/screen.png" alt="" /></div></div>
</header>
Key Adjustments
- Concentrated Content: The header element was retained to encapsulate the game's introduction. It houses the game title, and a brief tagline that hints at the nostalgic journey players are about to embark on.
- Navigation: A singular call-to-action button invites players directly to start playing, simplifying navigation and focusing user attention on game engagement.
- Visual Appeal: The phone image div was updated to include a screenshot of the game (or a conceptual visualization of it), offering a peek into the gameplay and visually communicating the game's premise.
Implementing in Svelte
Incorporating this HTML into a Svelte component involved creating a new +page.svelte file within the routes folder of my Svelte project. This approach leverages Svelte's routing capabilities to serve the landing page as the initial point of entry for users.
Building the GameGrid Component

The heart of the game's UI is the GameGrid component, situated within the lib/components folder. This component is tasked with displaying the current state of the grid and enabling the toggling of lights on and off. It acts as a direct reflection of the game's state, providing a visual and interactive element that captures the essence of the game.
In the construction of the GameGrid component, I harnessed several of Svelte's standout features to create a dynamic and interactive display of the game's grid. Utilizing export let, I exposed essential props such as data, representing the grid's current state with a two-dimensional boolean array, and onLightPressed, a callback function for handling light toggling events. This setup allows the component to reactively display the grid's state and respond to player interactions, directly tying the visual elements to the game's logic.
<script lang="ts">
  export let data: boolean[][];
  export let onLightPressed = (rowIndex: number, colIndex: number): void => {};
  // ...
</script>
To visually represent the grid, I employed dynamic styling and layout techniques, adjusting the grid's appearance based on its state. Variables like blockSize for the size of each light block and blockGap for the spacing between blocks were introduced to fine-tune the grid's look and feel. The grid's layout, leveraging CSS grid properties, is dynamically generated to fit the dimensions of the data prop, showcasing Svelte's ability to intertwine reactive data with CSS for a seamless UI experience.
<script lang="ts">
  // ...
  let blockSize = 50;
  let blockGap = 2;
  // ...
</script>
<div
style="border: 1px solid #000; width: fit-content; background-color: #dedede;">
<div
style="display: grid; grid-template-columns: repeat({columns}, {blockSize}px); grid-template-rows: repeat({rows}, {blockSize}px); grid-gap: {blockGap}px; width: {columns * blockSize + columns * blockGap - blockGap}px; background-color: #fff; margin: 20px;">
...
</div>
</div>
The core of the grid's interactivity is facilitated through Svelte's #each block, iterating over the data array to render each light as a customizable button. This approach not only streamlines the rendering process but also embeds interactivity directly within the grid's structure, enabling players to toggle lights on and off in their quest to solve the puzzle.
<script lang="ts">
  // ...
  let columns = data[0].length;
  let rows = data.length;
</script>
{#each data as row, rowIndex}
{#each row as col, colIndex}
<button
style="background-color: {col ? '#f00' : '#000'}; width: {blockSize}px; height: {blockSize}px;"
on:click={() => onLightPressed(rowIndex, colIndex)}
/>
{/each}
{/each}
By integrating these features and techniques, the GameGrid component not only serves as a visual representation of the game's current state but also as a bridge between the player and the game's underlying logic. The result is a component that is both functional and engaging.
Building the Game Page
The game page, created as another route (routes/game/+page.svelte), hosts the GameGrid component. It's here that the GameEngine is initialized, marrying the backend logic with the frontend display. This page serves as the operational hub, where players can start and restart the game, diving into the challenge Make It Dark presents.
Integrating the game logic into a user interface brings the gameplay experience to the forefront, facilitated by the powerful features of Svelte. The game page serves as the interactive canvas where players engage with the game, utilizing the foundational classes developed earlier—GridManager, LightToggleStrategy, WinConditionChecker—through the orchestrating GameEngine.
Integrating the Game Logic
<script lang="ts">
  import { GameEngine, GridManager, LightToggleStrategy, WinConditionChecker } from "$lib/engine";
  import GameGrid from "$lib/components/GameGrid.svelte";

  const engine = new GameEngine(
    new GridManager(),
    new LightToggleStrategy(),
    new WinConditionChecker(),
  );

  let started = false;
  let won = false;
  let moves = 0;
  let grid = engine.getGrid();
</script>
This script sets the stage, initializing the GameEngine with its necessary dependencies and defining reactive variables to track the game's state, moves, and grid status. It emphasizes how Svelte's reactivity system makes it straightforward to connect game logic with UI elements, ensuring updates are efficiently managed and rendered.
Facilitating Player Interaction
<div class="actions">
  <button on:click={() => startGame()}>Start</button>
  <button on:click={() => restartGame()}>Reset</button>
</div>

{#if started}
  <GameGrid data={grid} onLightPressed={toggleLight} />
  <p>Moves: {moves}</p>
{/if}

{#if won}
  <h2>You won!</h2>
{/if}
The game's interactivity is showcased here, with buttons for starting and restarting the game and the conditional rendering of the GameGrid component and move counter based on the game's state. The GameGrid component, in particular, is a direct reflection of the game's current grid state, allowing players to toggle lights in an attempt to solve the puzzle.
Styling for Engagement
<style>
  .full-height { min-height: 100vh; }
  .actions { display: flex; justify-content: center; gap: 20px; }
  .actions > button { padding: 0 2em; text-align: center; }
  .game-section { display: flex; justify-content: center; }
</style>
The styling emphasizes the game's UI, focusing on usability and visual appeal. The flexible CSS ensures that the game components are not only accessible and interactive but also pleasing to the eye, enhancing the overall player experience.
This implementation illustrates a seamless bridge between the game engine and its presentation layer by weaving together Svelte's reactivity and component-based architecture with the game's logic.
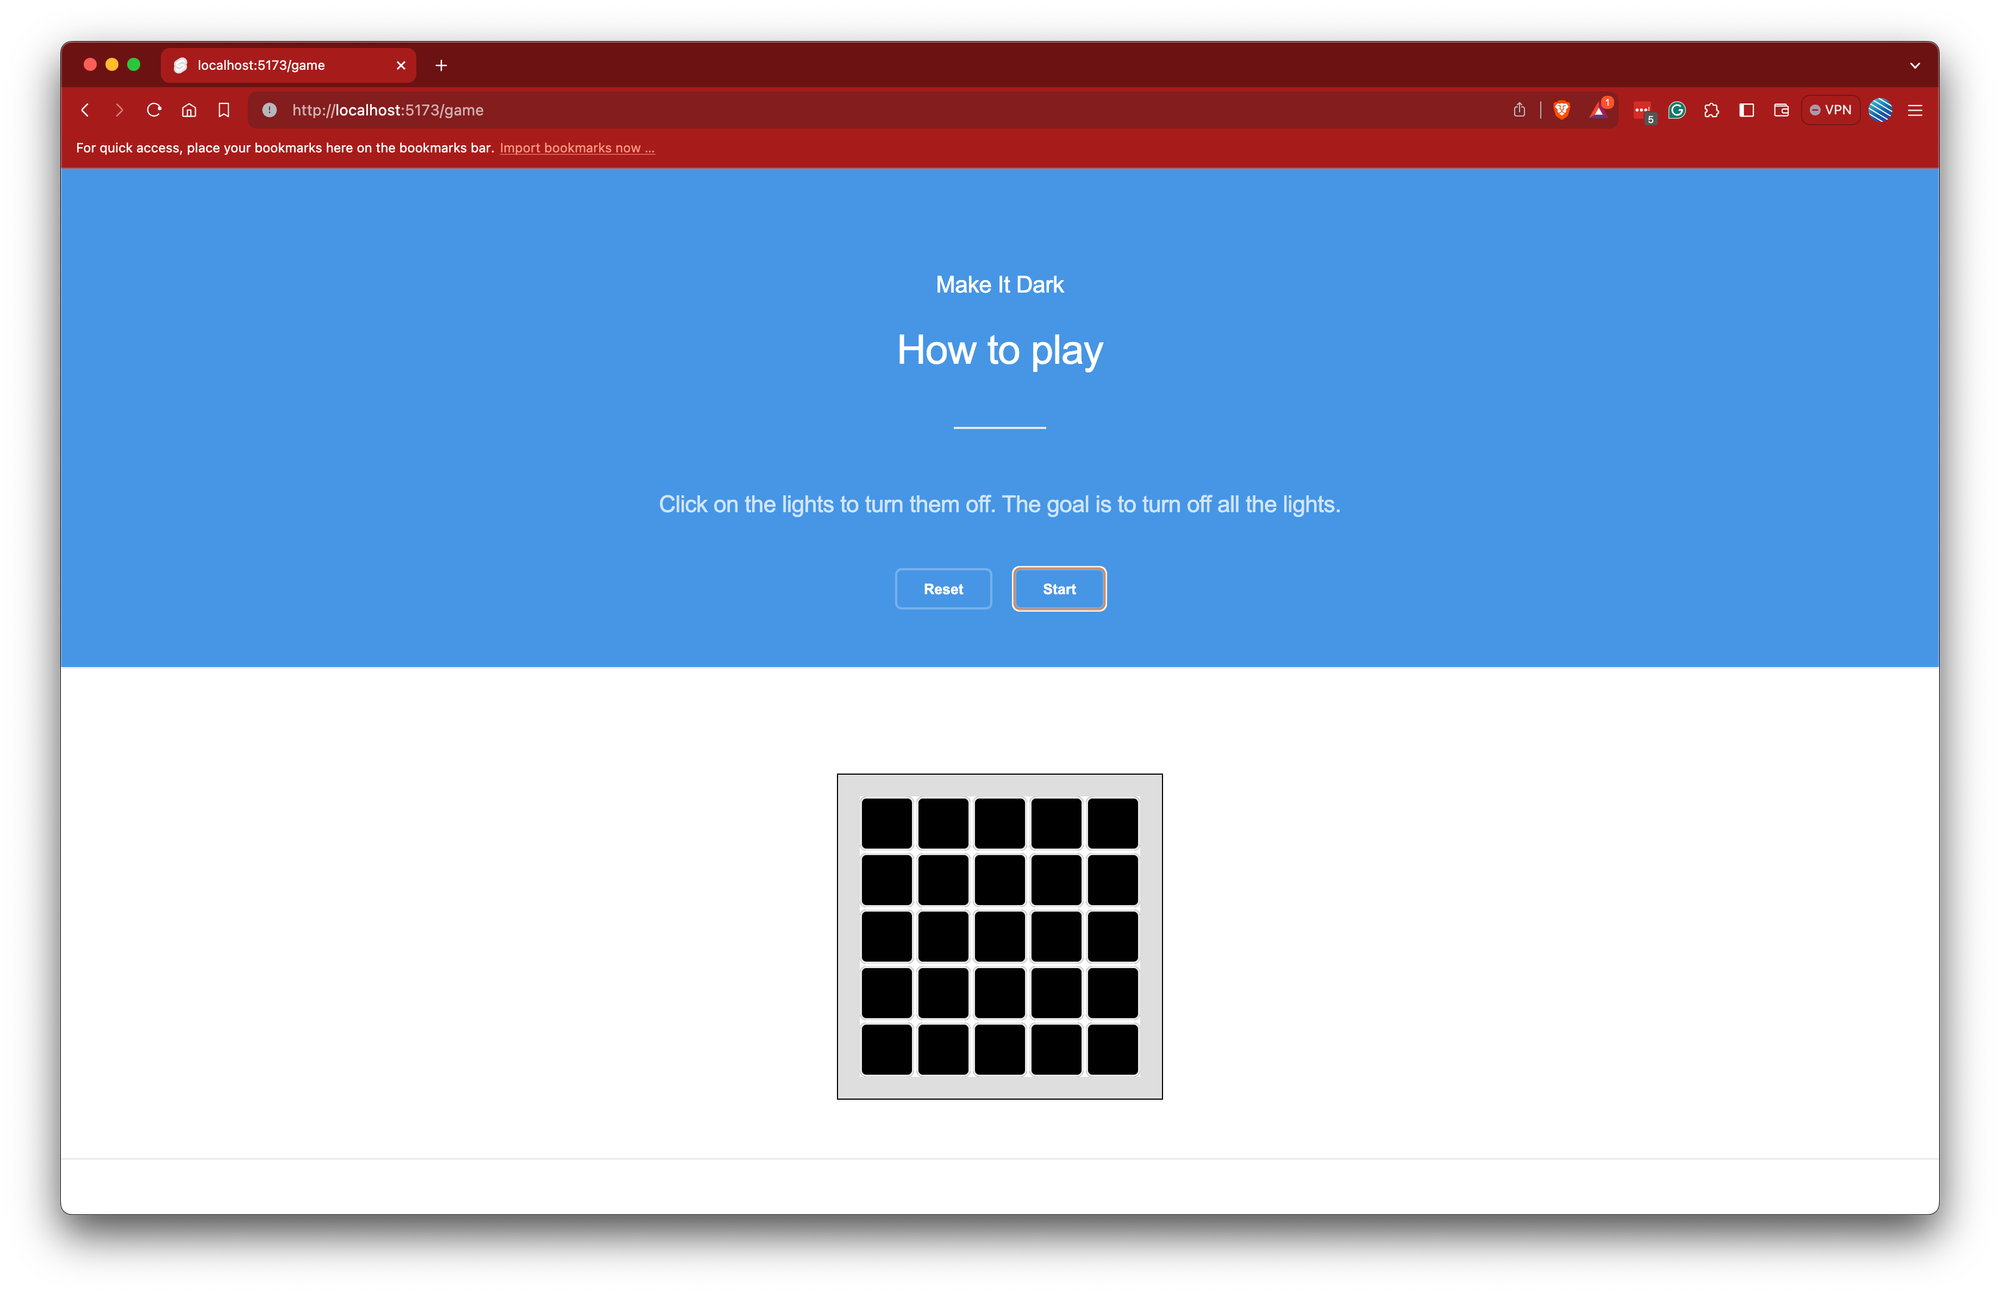
Creating the Game page
Creating the game page for Make It Dark within the Svelte framework marks a pivotal moment where the game's underlying logic seamlessly integrates with an interactive user interface. This page, located at routes/game/+page.svelte, serves as the main arena where players engage with the game, embodying the start, play, and reset functions within an aesthetically pleasing and intuitive layout.
The script section begins by importing the essential game logic components—GridManager, LightToggleStrategy, WinConditionChecker—and weaving them into the GameEngine. This foundational setup ensures that the game's mechanics are primed for execution. Additionally, the GameGrid component is imported to visually depict the game's grid, facilitating direct interaction through light toggles.
<script lang="ts">
  import { GridManager, LightToggleStrategy, WinConditionChecker, GameEngine } from "$lib/engine";
  import GameGrid from "$lib/components/GameGrid.svelte";

  const engine = new GameEngine(new GridManager(), new LightToggleStrategy(), new WinConditionChecker());
  let started = false;
  let won = false;
  let grid = engine.getGrid();

  function startGame() {
    engine.startGame();
    started = true;
    grid = engine.getGrid();
    won = false;
  }

  function restartGame() {
    engine.restartGame();
    grid = engine.getGrid();
    won = false;
  }

  function toggleLight(rowIndex: number, colIndex: number) {
    engine.toggleLight(rowIndex, colIndex);
    grid = engine.getGrid();
    won = engine.hasWon();
  }
</script>
This script meticulously tracks the game's progress through reactive variables such as started, won, and grid, responding dynamically to user interactions. The functions startGame, restartGame, and toggleLight manage the game's lifecycle and player interactions, updating the game state as appropriate.
The HTML structure, enriched by Svelte's reactive blocks, animates the game's interface:
<div class="full-height">
<section class="wrapper style1 special">
<header class="major">
<h1>Make It Dark</h1>
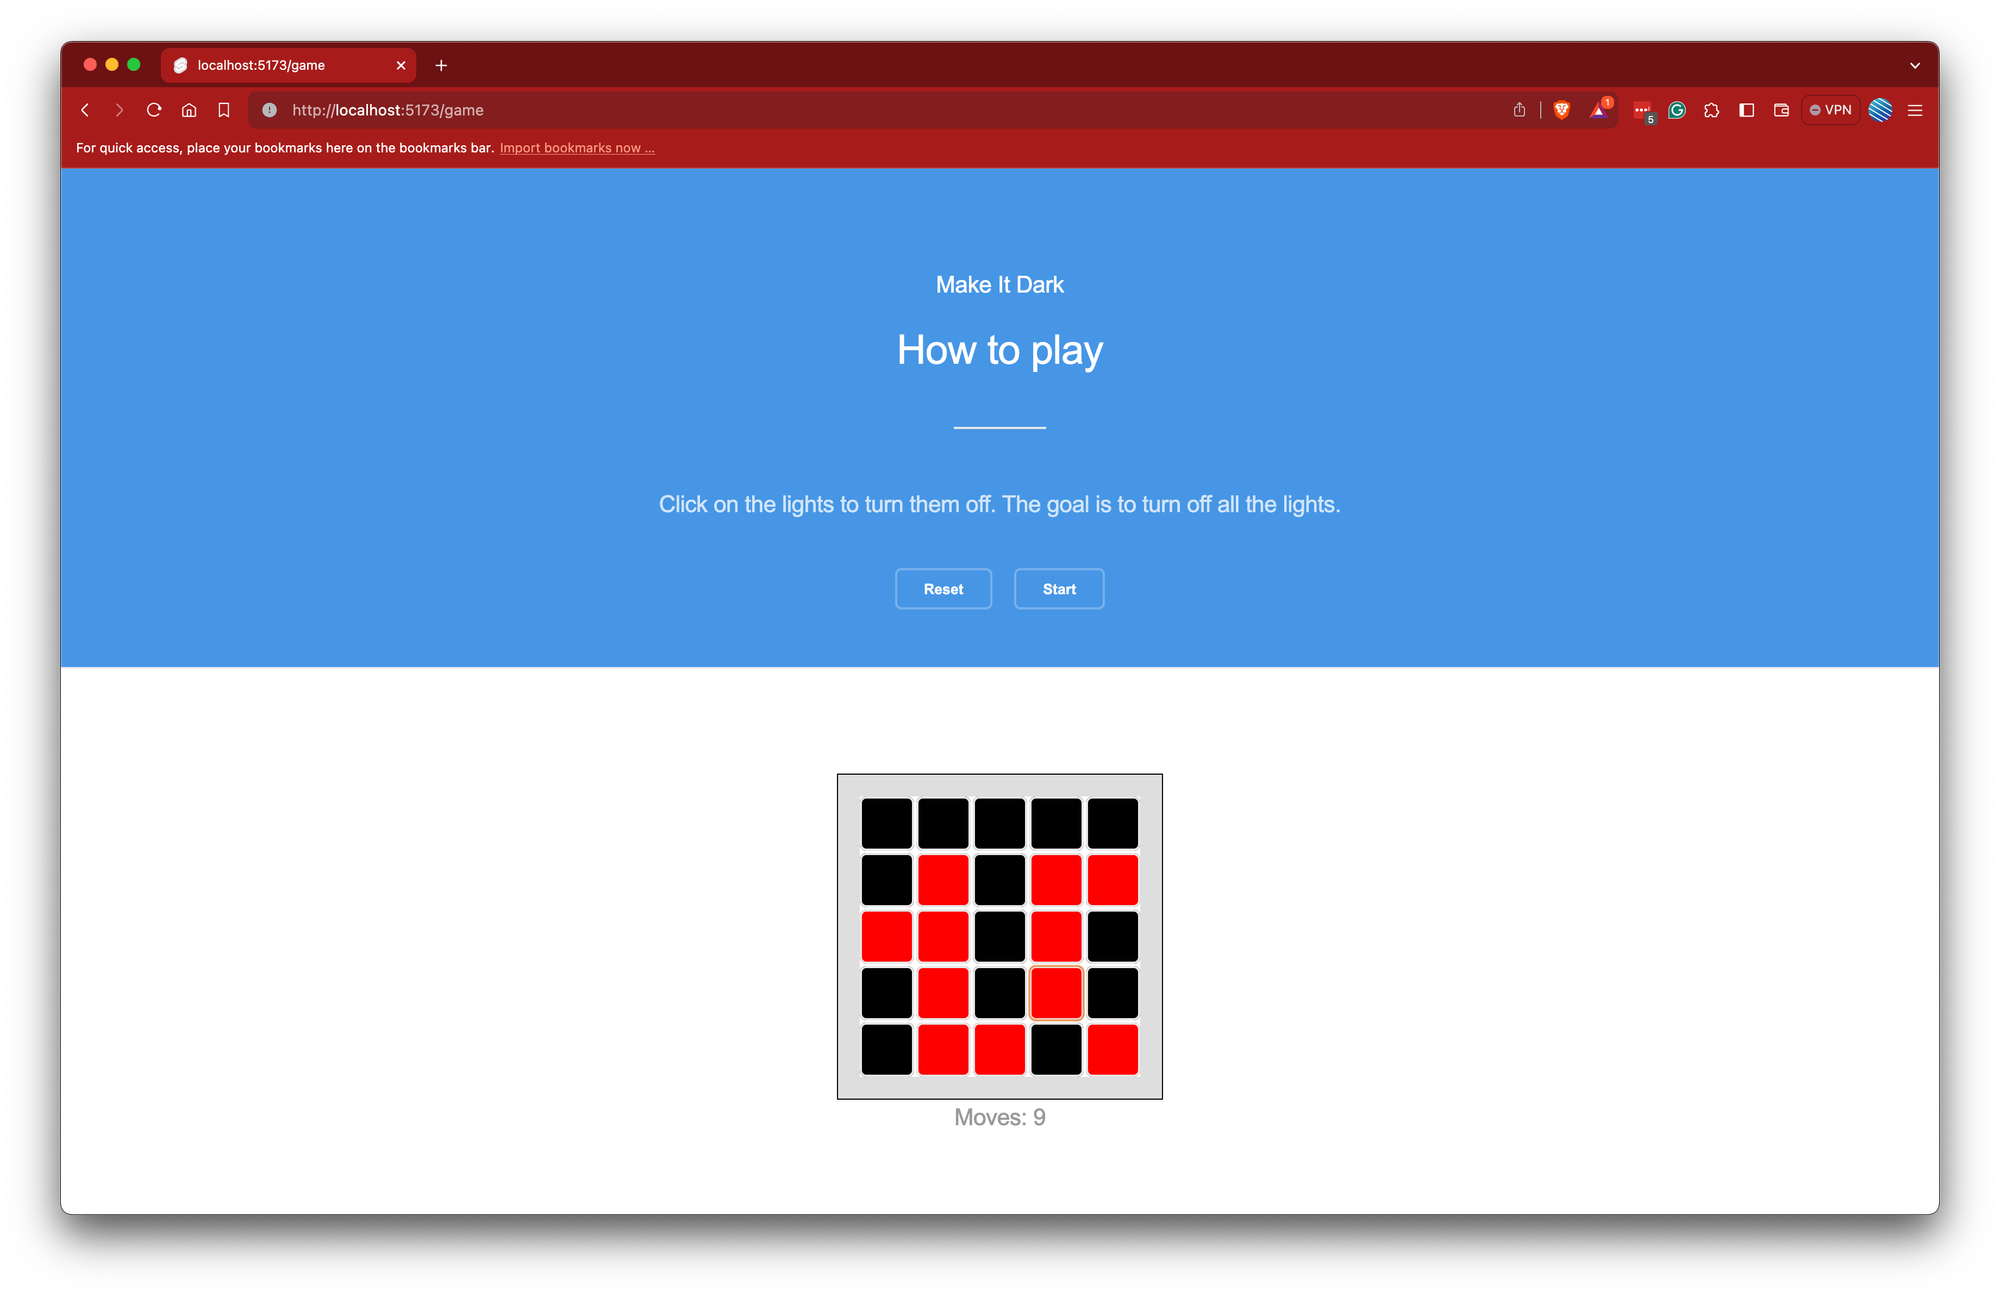
<p>Click on the lights to turn them off. The goal is to turn off all the lights.</p>
<div class="actions">
<button on:click={startGame}>Start</button>
<button on:click={restartGame}>Reset</button>
</div>
</header>
</section>
{#if won}
<section class="wrapper style3 special">
<h2>You won!</h2>
</section>
{/if}
{#if started}
<GameGrid data={grid} onLightPressed={toggleLight} />
{/if}
</div>
This configuration prioritizes user experience, presenting control buttons and game instructions prominently. Conditional rendering, based on the game's phase—whether in progress or concluded—ensures active engagement by providing immediate visual feedback on the player's actions.
Styled elements underscore the page's visual appeal, making the game elements not only operational but also visually harmonious and inviting. This deliberate design and style strategy ensures the game page is more than a mere interface for logic; it's a welcoming space that captures and holds player interest.
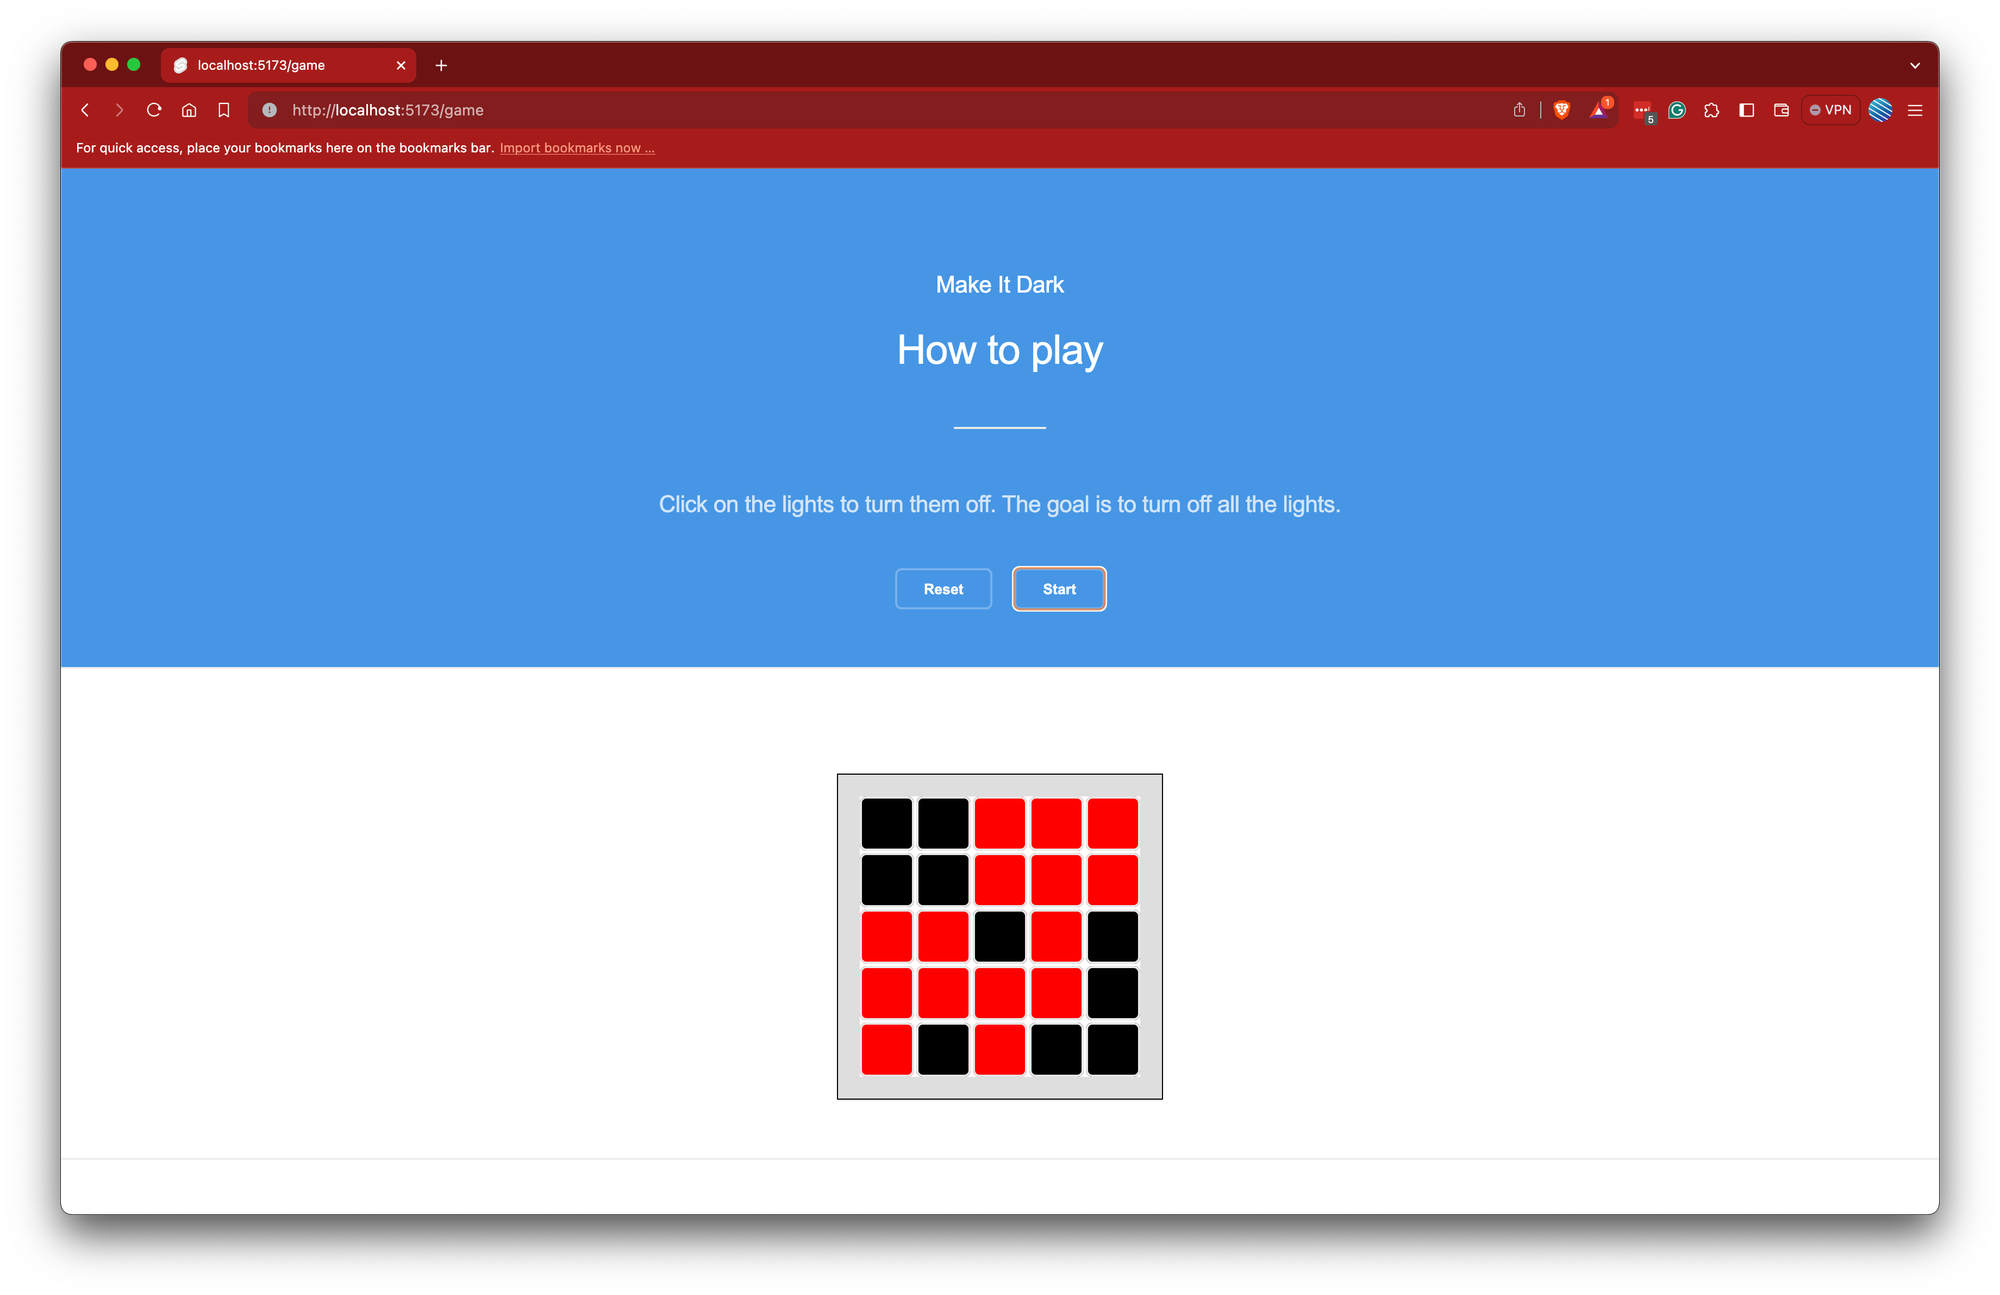
However, an initial oversight led to the game always starting with an empty grid, inadvertently simplifying the challenge to an immediate win condition. This revelation highlights the iterative essence of game development, where gameplay refinement and testing are integral to crafting a compelling and challenging experience.
Swiftly implementing the GridRandomizer class
Discovering the game consistently initiated with an empty grid illuminated a crucial oversight in the initial design, leading to an unintended shortcut to victory. To inject complexity and unpredictability into the game's startup, the GridRandomizer class was conceptualized. This addition aimed to diversify the grid's initial state, ensuring a challenging and engaging experience from the very start. The GridRandomizer class, with its function to randomize the grid, was then seamlessly integrated into the GameEngine, enhancing the gameplay with minimal structural impact yet significantly enriching its value.
Unit Tests for GridRandomizer
To validate the efficacy and reliability of the GridRandomizer, a series of unit tests were constructed:
import { beforeEach, describe, expect, it } from "vitest";
import { GridRandomizer } from "./GridRandomizer";

describe("GridRandomizer", () => {
  let gridRandomizer: GridRandomizer;

  beforeEach(() => {
    gridRandomizer = new GridRandomizer();
  });

  describe("randomize", () => {
    it("should randomize the grid", () => {
      const grid = [
        [false, false, false],
        [false, false, false],
        [false, false, false],
      ];

      const randomizedGrid = gridRandomizer.randomize(grid);

      expect(randomizedGrid).not.toStrictEqual(grid);
    });

    it("should randomize the grid with a 50% chance of being true", () => {
      const grid = [
        [false, false, false],
        [false, false, false],
        [false, false, false],
      ];

      const randomizedGrid = gridRandomizer.randomize(grid);

      // Testing the randomness involves checking the grid does not become uniformly true,
      // implying there's a balanced chance for each cell to be true or false.
      expect(randomizedGrid).not.toStrictEqual([
        [true, true, true],
        [true, true, true],
        [true, true, true],
      ]);
    });
  });
});
These tests focus on ensuring that the randomize function effectively alters the grid from its initial state, introducing a mix of true (on) and false (off) values across the grid. This randomness mimics the unpredictable nature of the game, providing a fresh challenge with each new session.
Implementation of GridRandomizer
The GridRandomizer class is succinct yet powerful in its ability to transform the game's dynamics:
export class GridRandomizer {
  randomize(grid: boolean[][]): boolean[][] {
    return grid.map((row) => row.map(() => Math.random() < 0.5));
  }
}
By iterating over each cell of the provided grid and deciding its state (on or off) based on a 50% probability, GridRandomizer ensures the game begins with a challenging and unpredictable setup. This simple approach, leveraging JavaScript's Math.random, introduces the desired variability without complicating the game's logic or the GameEngine's implementation.
This addition to the game's logic layer meant that the GameEngine needed to integrate GridRandomizer effectively, ensuring its use had a minimal impact on the existing structure while significantly enhancing gameplay value.
Integration into the GameEngine
The GridRandomizer's introduction into the game's framework underscores a critical enhancement in the gameplay mechanics. By modifying the GameEngine to incorporate the GridRandomizer, the initial grid setup now presents a varied landscape of lights, setting the stage for a more dynamic and engaging player experience.
class GameEngine {
  private initialGrid: boolean[][] = [];
  private grid: boolean[][] = [];

  constructor(
    private gridManager: GridManager,
    private lightToggleStrategy: LightToggleStrategy,
    private winConditionChecker: WinConditionChecker,
    private gridRandomizer: GridRandomizer = new GridRandomizer() // Newly added dependency
  ) {}

  startGame(): void {
    this.initialGrid = this.gridRandomizer.randomize(this.gridManager.createGrid(5, 5));
    this.grid = [...this.initialGrid];
  }

  // ...
}
With this integration, the GameEngine now leverages the GridRandomizer to ensure that each game begins with a grid that's both challenging and engaging, effectively addressing the previously identified flaw. This enhancement not only maintains the integrity of the game's design but also enriches the player's experience by offering a genuinely unpredictable and enjoyable puzzle with each new game.
Adding Additional Functionality
To enhance gameplay, a move counter was incorporated into the game page. This feature allows players to track the number of moves made, fostering a competitive spirit as they seek to outdo their past performances or compete with others.
Implementing Move Tracking
Integrating move tracking into the game required minimal adjustments to the existing codebase, demonstrating Svelte's ease in facilitating dynamic updates. The main concept revolves around incrementing a moves counter each time a player toggles a light, providing immediate feedback on their progress and strategy efficiency.
<script lang="ts">
  import { GameEngine, GridManager, LightToggleStrategy, WinConditionChecker } from "$lib/engine";
  import GameGrid from "$lib/components/GameGrid.svelte";

  const engine = new GameEngine(new GridManager(), new LightToggleStrategy(), new WinConditionChecker());
  let started = false;
  let won = false;
  let moves = 0; // Initialized move counter
  let grid = engine.getGrid();

  function startGame() {
    engine.startGame();
    started = true;
    grid = engine.getGrid();
    won = false;
    moves = 0; // Reset moves counter when game starts
  }

  function toggleLight(rowIndex: number, colIndex: number) {
    engine.toggleLight(rowIndex, colIndex);
    grid = engine.getGrid();
    won = engine.hasWon();
    moves += 1; // Increment moves counter on each light toggle
  }
</script>
This addition to the script section subtly enhances the game's depth, making each session more meaningful as players can now reflect on their approach through the quantifiable metric of moves made.
Displaying Move Count to Players
To make this new data point visible and useful to players, the game's UI needed to display the move count in a clear and intuitive manner. This was achieved by adding a simple paragraph element to the game page, updating reactively with each move:
{#if started}
  <GameGrid data={grid} onLightPressed={toggleLight} />
  <p>Moves: {moves}</p> <!-- Displaying the move count -->
{/if}
This straightforward addition, nestled within the conditional rendering block that checks if the game has started, ensures that the move count is only displayed during active gameplay, keeping the interface clean and focused.
Automated Game Testing Function
In an effort to rigorously test the game's mechanics, I implemented a function capable of automatically playing the game. Initially tested with a 3x3 grid for efficiency, this function highlighted the game's scalability challenges when expanding to a 5x5 grid, where the randomness of moves significantly increased the difficulty.
<script lang="ts">
  // ...

  setInterval(() => {
    if (started && !won) {
      const rows = grid.length;
      const cols = grid[0].length;

      toggleLight(Math.floor(Math.random() * rows), Math.floor(Math.random() * cols));
    }
  });
</script>
Conclusion

Reaching the end of this project marks a significant milestone in exploring Svelte and TDD. The journey from conceptualizing the game's mechanics to realizing them through code and finally presenting them within an interactive UI has been both challenging and rewarding. While there remains potential for further exploration, particularly in testing the UI, the foundation established provides a solid base for future enhancements.
Thank you for joining me on this exploration of Svelte and TDD. The process of bringing Make It Dark from a collection of ideas to a playable game has been a testament to the power of systematic development and the capabilities of modern web technologies.
You can find the code on my Github account at https://github.com/mrstebo/make-it-dark