Make It Dark - Turning Requirements into Code


Ah, finally, the moment has arrived where we transition from meticulous planning to the exciting phase of writing code. Up to this point, the focus has been on laying a robust foundation: establishing the project's architecture, embracing the principles of Test-Driven Development (TDD), and refining my coding style and linting preferences. The integration of Git hooks has also played a crucial role, ensuring every push to the repository adheres to consistent, high-quality standards. Now, it's time to bring all these preparations into fruition, translating the carefully gathered requirements into functional, well-tested code.
The Development Approach
As the coding phase begins, my strategy is rooted in clarity and precision. The transition from requirements to code involves a systematic process guided by the principles of Test-Driven Development (TDD). This approach is crucial for ensuring that each feature is not only necessary but implemented accurately and effectively.
- Setting Up Test Suites: The first step in addressing each requirement is establishing the structure of the test suite. Initially, these test suites will be outlines, framing the scope and nature of the tests that will follow. This stage is about creating a clear roadmap for the detailed testing and validation of each functionality.
- Detailing Individual Tests: With the framework set, the focus shifts to fleshing out each specific test. Here, the purpose and necessity of every test are explored, elucidating how it contributes to fulfilling the corresponding requirement. This phase is integral, not just for functionality checks but for gaining a deeper understanding of the role each test plays in the game's mechanics.
- Coding to Fulfill Tests: The final and crucial step is the coding process. In this phase, the outlined tests become the driving force behind the development of functionalities. The process involves writing code, rigorously testing it against the predefined tests, and refining it through iterative development and refactoring.
This approach is designed to ensure that every piece of code is purposeful and contributes meaningfully to the overall gameplay experience. By adhering to TDD, the development is structured and focused, ensuring that the game not only functions as intended but does so in a way that aligns seamlessly with the game’s core objectives. This disciplined methodology sets the stage for building a game that is both engaging and technically sound.
Object-Oriented Programming
In shaping the codebase for Make It Dark, my inclination towards Object-Oriented Programming (OOP), stemming from my extensive experience with languages like C# and Java, plays a pivotal role. I’ve chosen to structure the game’s logic using classes (apologies, Ash 🥲), a decision that aligns with my familiarity and comfort with OOP principles. This approach not only aids in organizing the code into logical, manageable units but also facilitates maintainability and scalability. Let's outline the key classes that will form the backbone of Make It Dark’s functionality:
GridManager: The cornerstone of our game, theGridManager, is tasked with creating and managing the grids that are central to Make It Dark. This class will handle the initialization of the grid based on specified dimensions and possibly other parameters, ensuring that the grid is always in a valid state for gameplay.LightToggleStrategy: A crucial aspect of the game is the logic behind toggling lights on the grid. TheLightToggleStrategyclass will encapsulate this logic, determining how the state of the grid changes with each interaction. This class allows for flexibility and creativity in defining how each light toggle affects the grid, potentially allowing for different game modes or variations in the future.WinConditionChecker: Winning the game isn't just about turning off all the lights; it's about meeting specific conditions defined within the game. TheWinConditionCheckerclass will house the rules and logic to determine whether the player has met the winning criteria, adding an essential layer of gameplay and challenge.GameEngine: Acting as the central interface through which the player interacts with the game, theGameEngineclass ties everything together. It serves as a proxy layer, facilitating interactions between the player and the underlying components like theGridManager,LightToggleStrategy, andWinConditionChecker. TheGameEngineensures that these components work in harmony, providing a seamless and engaging gameplay experience.
By using these classes, I aim to create a clear and logical structure for my game, where each class has a distinct responsibility and contributes to the overall functionality of the game. This object-oriented approach not only aligns with my programming preferences but also ensures that the game's code is robust, testable, and extendable. As we delve deeper into the coding phase, these classes will be fleshed out, each playing its part in bringing the game to life.
The GridManager Class
The GridManager class is a cornerstone in Make It Dark, responsible for generating the game's grid—a fundamental aspect of gameplay. It must not only create grids of varying sizes but also ensure each cell's initial state is set correctly and handle invalid grid dimensions gracefully.
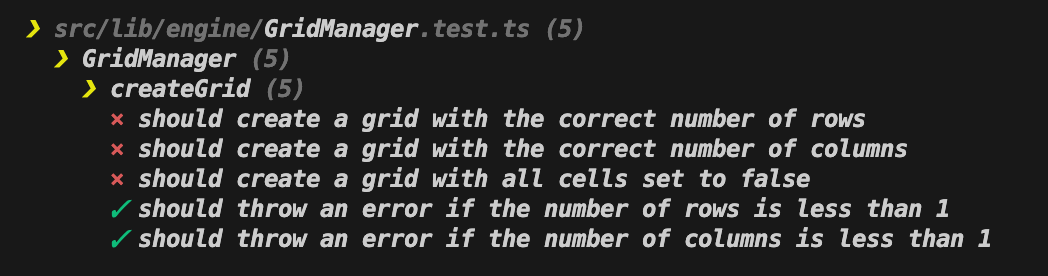
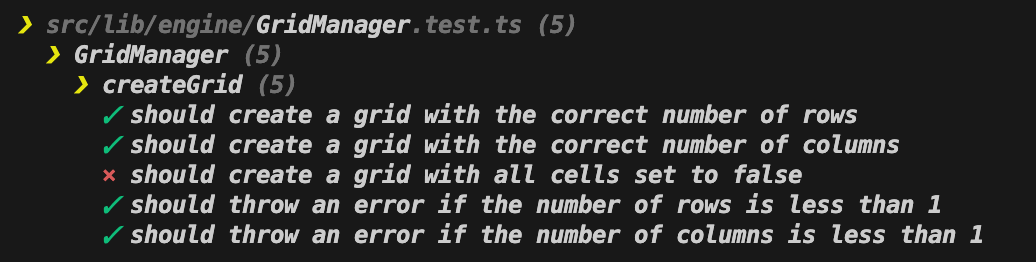
The Tests
The test suite for GridManager is designed to validate each aspect of its functionality, ensuring the class behaves as expected under various scenarios.
import { beforeEach, describe, expect, it } from "vitest";
import { GridManager } from "./GridManager";

describe("GridManager", () => {
  let gridManager: GridManager;

  beforeEach(() => {
    gridManager = new GridManager();
  });

  describe("createGrid", () => {
    it("should create a grid with the correct number of rows", () => {
      const rows = 3;
      const columns = 3;

      const grid = gridManager.createGrid(rows, columns);

      expect(grid.length).toEqual(rows);
    });

    it("should create a grid with the correct number of columns", () => {
      const rows = 3;
      const columns = 3;

      const grid = gridManager.createGrid(rows, columns);

      expect(grid[0].length).toEqual(columns);
    });

    it("should create a grid with all cells set to false", () => {
      const rows = 3;
      const columns = 3;

      const grid = gridManager.createGrid(rows, columns);

      expect(grid).toStrictEqual([
        [false, false, false],
        [false, false, false],
        [false, false, false]
      ]);
    });

    it("should throw an error if the number of rows is less than 1", () => {
      expect(() => gridManager.createGrid(0, 5)).toThrow("Number of rows must be greater than 0");
    });

    it("should throw an error if the number of columns is less than 1", () => {
      expect(() => gridManager.createGrid(5, 0)).toThrow("Number of columns must be greater than 0");
    });
  });
});
The Implementation
I am going to implement the GridManager class in is a step-by-step process, aligning with the Test-Driven Development (TDD) approach. Here’s how each test shapes the gradual build-up of the class.
Initially, GridManager is a simple class without any methods:
export class GridManager {}The first implementation step addresses the tests for invalid grid sizes. I start by adding a createGrid method that includes validation checks:
class GridManager {
  createGrid(rows: number, columns: number): boolean[][] {
    if (rows < 1) {
      throw new Error("Number of rows must be greater than 0");
    }

    if (columns < 1) {
      throw new Error("Number of columns must be greater than 0");
    }

    return [];
  }
}
This ensures the class correctly handles requests for grids with zero or negative dimensions. I also find it advantageous to work on the tests that have error conditions first, as it ensures that any leading tests I run have valid inputs.
I also extend the createGrid method to create a grid. Initially, it returns an empty array, which is enough to pass the dimension validation tests but not the grid creation tests.
To satisfy the tests for the correct number of rows and columns, the createGrid method is further refined to return a grid of the specified dimensions:
export class GridManager {
  createGrid(rows: number, columns: number): boolean[][] {
    if (rows < 1) {
      throw new Error("Number of rows must be greater than 0");
    }

    if (columns < 1) {
      throw new Error("Number of columns must be greater than 0");
    }

    return Array.from({ length: rows }, () => new Array(columns));
  }
}
At this stage, the grid is created with the correct dimensions, but the cell states are not yet set.
Finally, to pass the test that checks the initial state of the grid's cells, I update the grid creation logic to set all cells to false:
export class GridManager {
  createGrid(rows: number, columns: number): boolean[][] {
    if (rows < 1) {
      throw new Error("Number of rows must be greater than 0");
    }

    if (columns < 1) {
      throw new Error("Number of columns must be greater than 0");
    }

    return Array.from({ length: rows },
      () => Array.from({ length: columns }, () => false)
    );
  }
}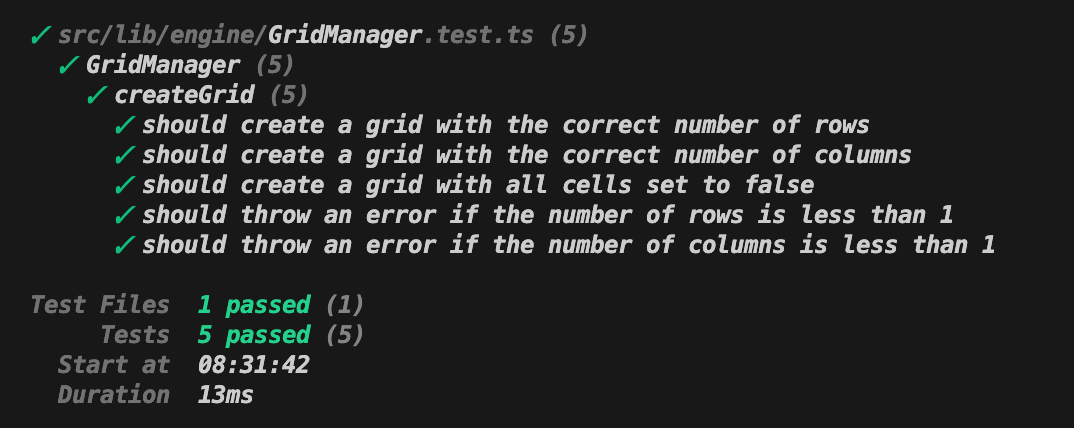
This completes the GridManager implementation, ensuring it meets all the outlined tests.
Through this step-by-step implementation, aligned with the TDD methodology, the GridManager evolves from a basic class into a functional component capable of generating and managing the game's grid.
The LightToggleStrategy Class
In Make It Dark, the LightToggleStrategy class plays a key role in defining the game's core mechanics. This class is responsible for changing the state of lights on the grid, including adjacent lights, based on player interactions. It is crucial for ensuring the game's logic is consistent and adheres to the defined rules of how lights should behave when toggled.
The Tests
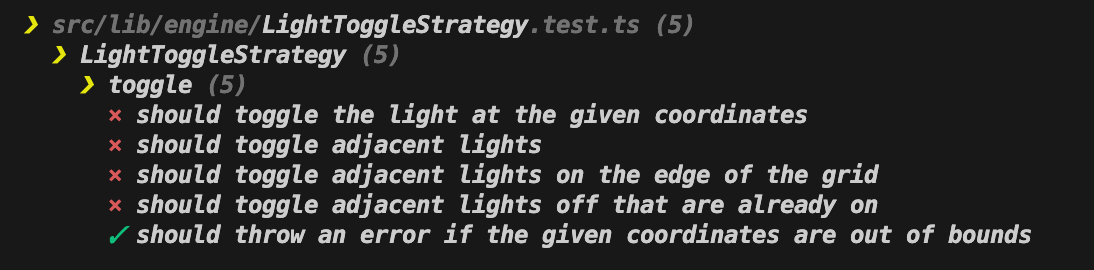
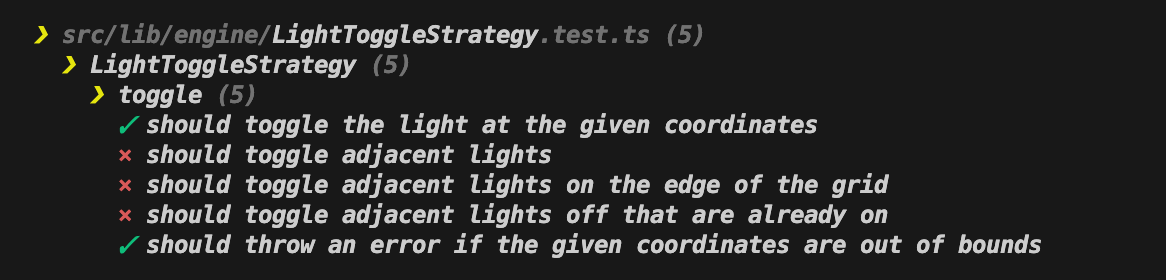
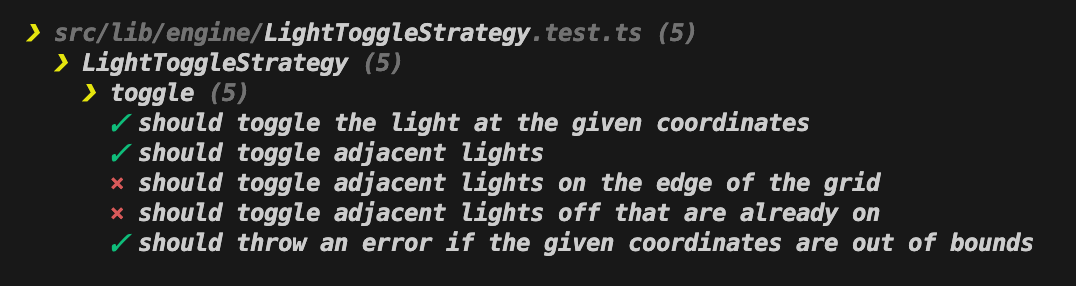
The test suite for LightToggleStrategy is designed to validate several key aspects of light toggling behaviour:
import { beforeEach, describe, expect, it } from "vitest";
import { LightToggleStrategy } from "./LightToggleStrategy";

describe("LightToggleStrategy", () => {
  let lightToggleStrategy: LightToggleStrategy;

  beforeEach(() => {
    lightToggleStrategy = new LightToggleStrategy();
  });

  describe("toggle", () => {
    it("should toggle the light at the given coordinates", () => {
      const grid = [
        [false, false, false],
        [false, false, false],
        [false, false, false],
      ];

      const updatedGrid = lightToggleStrategy.toggle(grid, 1, 1);

      expect(updatedGrid[1][1]).toEqual(true);
    });

    it("should toggle adjacent lights", () => {
      const grid = [
        [false, false, false],
        [false, false, false],
        [false, false, false],
      ];

      const updatedGrid = lightToggleStrategy.toggle(grid, 1, 1);

      expect(updatedGrid).toStrictEqual([
        [false, true, false],
        [true, true, true],
        [false, true, false],
      ]);
    });

    it("should toggle adjacent lights on the edge of the grid", () => {
      const grid = [
        [false, false, false],
        [false, false, false],
        [false, false, false],
      ];

      const updatedGrid = lightToggleStrategy.toggle(grid, 0, 0);

      expect(updatedGrid).toStrictEqual([
        [true, true, false],
        [true, false, false],
        [false, false, false],
      ]);
    });

    it("should toggle adjacent lights off that are already on", () => {
      const grid = [
        [false, true, false],
        [true, true, true],
        [false, true, false],
      ];

      const updatedGrid = lightToggleStrategy.toggle(grid, 0, 0);

      expect(updatedGrid).toStrictEqual([
        [true, false, false],
        [false, true, true],
        [false, true, false],
      ]);
    });

    it("should throw an error if the given coordinates are out of bounds", () => {
      const grid = [
        [false, false, false],
        [false, false, false],
        [false, false, false],
      ];

      expect(() => lightToggleStrategy.toggle(grid, -1, 0)).toThrow("Row -1 is out of bounds");
      expect(() => lightToggleStrategy.toggle(grid, 0, -1)).toThrow("Column -1 is out of bounds");
      expect(() => lightToggleStrategy.toggle(grid, 3, 0)).toThrow("Row 3 is out of bounds");
      expect(() => lightToggleStrategy.toggle(grid, 0, 3)).toThrow("Column 3 is out of bounds");
    });
  });
});
The Implementation
With the tests defined, the LightToggleStrategy class can be implemented to satisfy these requirements.
Initially, LightToggleStrategy is an empty class:
export class LightToggleStrategy {}The main functionality revolves around the toggle method. This method must toggle the state of the specified light. However, I will tackle the error conditions first:
export class LightToggleStrategy {
  toggle(grid: boolean[][], row: number, column: number): boolean[][] {
    const updatedGrid = grid.map((row) => [...row]);

    if (row < 0 || row >= grid.length) {
        throw new Error(`Row ${row} is out of bounds`);
    }

    if (column < 0 || column >= grid[0].length) {
        throw new Error(`Column ${column} is out of bounds`);
    }

    return updatedGrid;
  }
}
Now that the error cases have been handled, the method can be updated to toggle the state of the specified light:
class LightToggleStrategy {
  toggle(grid: boolean[][], row: number, col: number): boolean[][] {
    const updatedGrid = grid.map((row) => [...row]);

    updatedGrid[row][column] = !updatedGrid[row][column];

    return updatedGrid;
  }
}
I can now extend the toggle method to also toggle adjacent lights:
export class LightToggleStrategy {
  toggle(grid: boolean[][], row: number, column: number): boolean[][] {
    const updatedGrid = grid.map((row) => [...row]);

    updatedGrid[row][column] = !updatedGrid[row][column];

    updatedGrid[row - 1][column] = !updatedGrid[row - 1][column];
    updatedGrid[row + 1][column] = !updatedGrid[row + 1][column];
    updatedGrid[row][column - 1] = !updatedGrid[row][column - 1];
    updatedGrid[row][column + 1] = !updatedGrid[row][column + 1];

    return updatedGrid;
  }
}
Finally, I need to ensure that I handle edge cases, such as when the light is at the border of the grid:
export class LightToggleStrategy {
  toggle(grid: boolean[][], row: number, column: number): boolean[][] {
    const updatedGrid = grid.map((row) => [...row]);

    updatedGrid[row][column] = !updatedGrid[row][column];

    if (row > 0) {
      updatedGrid[row - 1][column] = !updatedGrid[row - 1][column];
    }

    if (row < grid.length - 1) {
      updatedGrid[row + 1][column] = !updatedGrid[row + 1][column];
    }

    if (column > 0) {
      updatedGrid[row][column - 1] = !updatedGrid[row][column - 1];
    }

    if (column < grid[0].length - 1) {
      updatedGrid[row][column + 1] = !updatedGrid[row][column + 1];
    }

    return updatedGrid;
  }
}
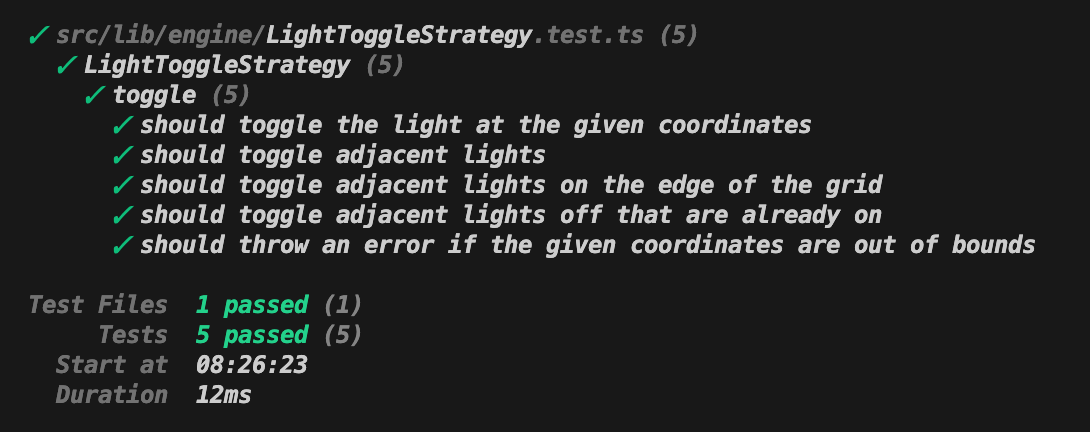
Through this implementation process, the LightToggleStrategy evolves into a functional component of Make It Dark, capable of handling the intricate logic of light toggling.
The WinConditionChecker Class
Next up, I will be looking at the WinConditionChecker class, tasked with evaluating the grid to determine if the player has met the win conditions. Unlike traditional games where winning might involve reaching a certain score or level, Make It Dark's victory criteria are based on the state of the grid - specifically, whether all lights have been turned on. This class encapsulates the logic needed to assess the grid's state, providing a clear and concise check that can be called at any point in the game to determine if the player has won.
The Tests
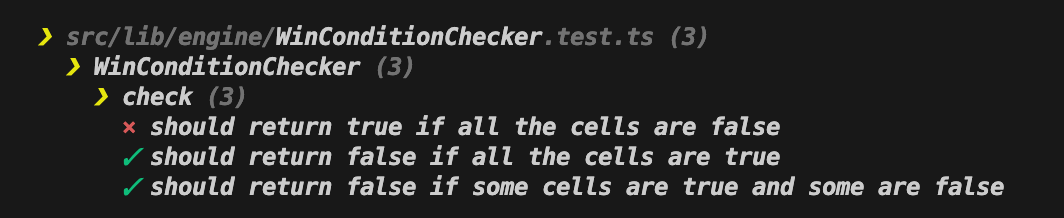
The tests designed for WinConditionChecker aim to cover all possible scenarios the player might encounter:
import { beforeEach, describe, expect, it } from "vitest";
import { WinConditionChecker } from "./WinConditionChecker";

describe("WinConditionChecker", () => {
  let winConditionChecker: WinConditionChecker;

  beforeEach(() => {
    winConditionChecker = new WinConditionChecker();
  });

  describe("check", () => {
    it("should return true if all the cells are false", () => {
      const grid = [
        [false, false, false],
        [false, false, false],
        [false, false, false],
      ];

      const result = winConditionChecker.check(grid);

      expect(result).toBe(true);
    });

    it("should return false if all the cells are true", () => {
      const grid = [
        [true, true, true],
        [true, true, true],
        [true, true, true],
      ];

      const result = winConditionChecker.check(grid);

      expect(result).toBe(false);
    });

    it("should return false if some cells are true and some are false", () => {
      const grid = [
        [true, false, false],
        [false, true, false],
        [false, false, true],
      ];

      const result = winConditionChecker.check(grid);

      expect(result).toBe(false);
    });
  });
});
The Implementation
To fulfil the outlined tests, WinConditionChecker needs a check method that can accurately assess the state of the grid.
Initially, WinConditionChecker is an empty class:
class WinConditionChecker {}
The core functionality resides in the check method, which initially will return false until we provide the actual implementation.
class WinConditionChecker {
  check(grid: boolean[][]): boolean {
    return false;
  }
}
Next, I can refine the new method to accurately return true when all lights in the grid are turned off.
export class WinConditionChecker {
  check(grid: boolean[][]): boolean {
    return grid.every((row) => row.every((light) => !light));
  }
}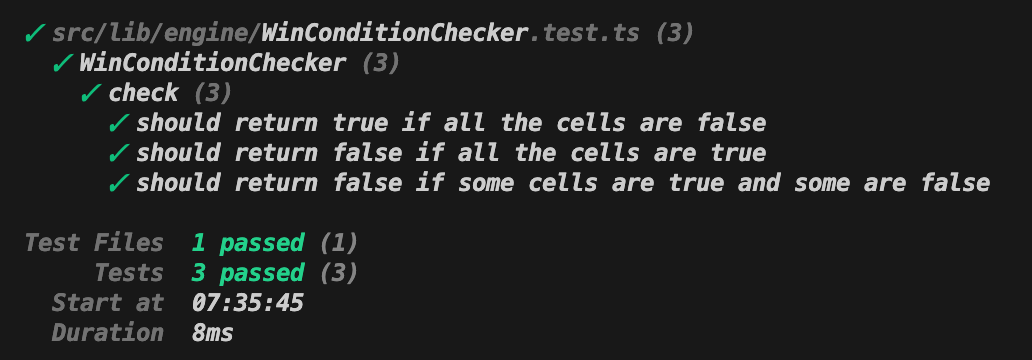
Through this implementation, WinConditionChecker becomes a crucial element in determining the progression and conclusion of Make It Dark. The class's method, developed and refined through TDD, provides a reliable means to assess the game's win condition. This ensures that the game's objectives are clear and that the condition for winning is consistently applied, enhancing the game's playability and challenge.
Pausing For Now...

After developing the GridManager, LightToggleStrategy, and WinConditionChecker with a focus on Test-Driven Development, the groundwork for the core game mechanics is now in place. These components are crucial for setting up the gameplay, managing the grid, and defining the conditions for winning.
At this point, it's appropriate to pause and prepare for the next steps. Integrating these components into a unified system will be tackled in the next phase of development, specifically through the GameEngine class. This class will serve as the central hub for interaction within the game, tying together the logic and functionality of the various components.
The GameEngine will also illustrate the implementation of the Proxy pattern, streamlining the complexity of interactions. The focus on this pattern in the upcoming work will show how it aids in managing the game state and delegating tasks efficiently.
This staged development approach ensures that each part of the game is built with attention to detail and integrates seamlessly. The next step, focusing on the GameEngine, is crucial for bringing together the game's logic and providing a smooth gameplay experience. It marks a significant transition from building the game's foundational elements to focusing on the architecture that will drive the game forward.